And another highlight today...
Apart from the deblurring in DNGMonochrome - which will be in the next release - as written in previous post, I also got interested in deblurring color DNGs, whilst keeping them 'RAW': not deblurring the exported end result (usually a JPG), but deblurring the DNG before it's developed. That way you won't have to go back to the deblur software each time you decide you want something changed in the DNG.
That all worked better as expected, as shown also in previous post.
I then set out to program a new piece of software, called DNGDeblur, specifically for color DNGs (although it can also deblur monochrome DNGs). However, when putting it all together, it turned out the deblurring of the color DNGs was tediously slow when they get into the size of the Leica M DNGs. Took my reasonably fast system some 8 minutes per M-photo. The Canon 5DII and 5DIII a similar story. They all have a width that goes beyond 4096 pixels, which means the width and height doubles to 8192 by 8192 values, since the FFT needs a power of two to work properly. But since that actually quadruples the total amount of values (compared to a 4096 by 4096 for say a Canon 40D DNG), the time it takes also quadruples.
Having solved the huge memory demands, I was now doubting the whole endeavour on account of speed. Waiting 8 minutes per photo... not very practical.
Then, after already cutting the 8 minutes back to 5 minutes per photo, by smartening up the software, today I finally had the right idea.
The whole procedure for a color DNG is now as fast as the one for a monochrome DNG. The M DNGs take around a minute (70 - 80 seconds), and a Canon 40D color DNG is processed in 20 seconds. This will eventually slow down again a bit, since I still need to implement some additional procedures, and on slower systems it will obviously be slower, but I hope to stay at least under 2 minutes per DNG on my own system, which is quite an improvement compared to the 8 minutes I started with.
I can't put a release date on this software yet, but I hope to have it ready within a few weeks...

Thursday, October 17, 2013
Sunday, September 29, 2013
Blurry vision III
And a small victory today...
On a side track I've been testing color DNGs, to figure out if it is actually possible to deblur a RAW file in stead of an exported JPG. I couldn't find a theoretical reason why not, but seeing that a DNG still needs to be interpolated, I did wonder if filtering the RAW values like the deblurring does, would lead to any problems.
Basically I'm using the engine of DNGMonochrome: interpolate the three color planes (green, red and blue), deblur all the color planes with the same kernel, then write back the DNG as a RAW file, with the replaced pixel values for green, red and blue. Producing what I was looking for: a deblurred - non interpolated - RAW file.
Deblur first, develop later.
First attempts were rather horrendous, but today I had some success.
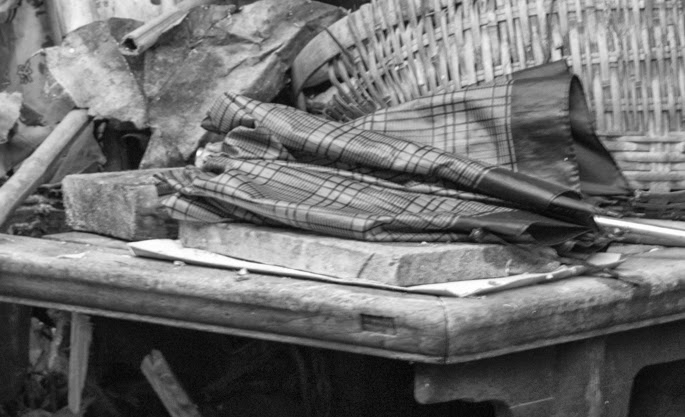
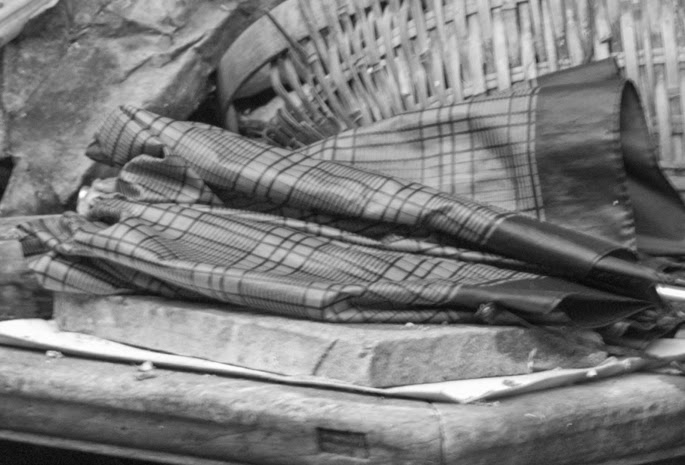
It's the same umbrella - from my previous post - but now in color. The 'deblur' is slightly less spectacular, but that's because I'm currently deblurring on a preview of the grayscale version of the photo. I haven't implemented a color preview yet.
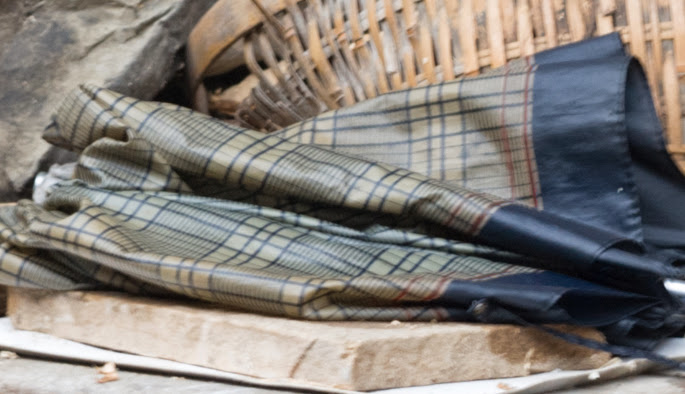
Small crop from a blurred Canon 40D photo... Move over the image with your mouse to see the blur corrected version... JPG produced from a deblurred DNG...
On a side track I've been testing color DNGs, to figure out if it is actually possible to deblur a RAW file in stead of an exported JPG. I couldn't find a theoretical reason why not, but seeing that a DNG still needs to be interpolated, I did wonder if filtering the RAW values like the deblurring does, would lead to any problems.
Basically I'm using the engine of DNGMonochrome: interpolate the three color planes (green, red and blue), deblur all the color planes with the same kernel, then write back the DNG as a RAW file, with the replaced pixel values for green, red and blue. Producing what I was looking for: a deblurred - non interpolated - RAW file.
Deblur first, develop later.
First attempts were rather horrendous, but today I had some success.
It's the same umbrella - from my previous post - but now in color. The 'deblur' is slightly less spectacular, but that's because I'm currently deblurring on a preview of the grayscale version of the photo. I haven't implemented a color preview yet.
Small crop from a blurred Canon 40D photo... Move over the image with your mouse to see the blur corrected version... JPG produced from a deblurred DNG...
Saturday, September 28, 2013
Blurry vision II
Making some progress with the deblurring. I haven't shown you any shots of the user interface yet, because that's still unfinished, although it is getting closer to a presentable version. In general I'd say that if you'd like to use this in a next version of DNGMonochrome, be aware it's not a one-click solution. Some photos really require some effort to get to an acceptable result, and the method itself will never lead to 'perfection'. It's simply not possible (I think) to filter photos like this without some downsides (as in additional artifacts thrown in for free). Personally I think this method is only useful if the blur isn't too extensive.
Here's another quick example...
 Blurry original... (no mouseover on this one, see the crops below...)
Small crop from a blurred Canon 40D photo, converted with DNGMonochrome... note that this is a real life shot, not some fake blurred image... the monochrome DNG was then developed in Lightroom, with no sharpening and no noise reduction. Move over the image with your mouse to see the blur corrected version produced by DNGMonochrome, which got exactly the same treatment in Lightroom (no sharpening nor noise reduction)...
Same as above, but an even smaller piece of the photo... move over the image with your mouse to see the blur corrected version produced by DNGMonochrome...

Same as above, but now the blurred original was sharpened 70% in Lightroom... as you can see - for the more doubtful - the deblurring isn't comparable to sharpening... Move over the image with your mouse to see the blur corrected version produced by DNGMonochrome (which was not sharpened)...
Here's another quick example...
Blurry original... (no mouseover on this one, see the crops below...)Small crop from a blurred Canon 40D photo, converted with DNGMonochrome... note that this is a real life shot, not some fake blurred image... the monochrome DNG was then developed in Lightroom, with no sharpening and no noise reduction. Move over the image with your mouse to see the blur corrected version produced by DNGMonochrome, which got exactly the same treatment in Lightroom (no sharpening nor noise reduction)...
Same as above, but an even smaller piece of the photo... move over the image with your mouse to see the blur corrected version produced by DNGMonochrome...
Same as above, but now the blurred original was sharpened 70% in Lightroom... as you can see - for the more doubtful - the deblurring isn't comparable to sharpening... Move over the image with your mouse to see the blur corrected version produced by DNGMonochrome (which was not sharpened)...
Thursday, September 26, 2013
Blurry vision I
Ok, well, this is not really about blurry vision, more about blurry photographs, and the methods to get rid of that blur.
I've been experimenting a bit with it in DNGMonochrome.
There's several solutions available (in software) out there, to deblur photos. Be it motion blur (camera shake) or blur due to focus errors. But the problem with those solutions (some are actually quite good) is that they only work on the finished end product. You have to export your RAW or DNG first to JPG or PNG, then deblur that photo.
I find that rather tedious, because once you've done all that and you decide you still need to make some adjustments to the RAW photo in e.g. Lightroom, you have to go through the whole process of deblurring the final export again. I regularly go back to older DNGs or CR2s and redo them. Software progresses, your own vision of how a photo should look might change, and then you still have to have the deblurring software around and remember the settings for that particular photo. It's just not very convenient.
I think this deblurring should take place on the DNG or the RAW file, before you start working on it in your RAW developer. Problem is: so far I haven't found software that actually tackles the RAW file.
So, introducing the blur/deblur filter in DNGMonochrome, with plans to extend it to color DNGs. Deblur first, then develop, in stead of develop, deblur afterwards.
Yes, ok, but wait...
How does this work?
Well, it works.
Let me show you...
Move over the image with your mouse to see the difference...
Small crop from a slightly blurred Canon 40D, most likely a focus error, converted with DNGMonochrome... note that this is a real life shot, not some fake blurred image... the monochrome DNG was then developed in Lightroom, with no sharpening and no noise reduction. Move over the image with your mouse to see the blur corrected version produced by DNGMonochrome, which got exactly the same treatment in Lightroom (no sharpening nor noise reduction)...
As you can see - although this example is quite subtle, I don't have many blurry real life shots, because I usually throw them - it really works.
The deblurring filter uses a Fourier transform of the photo (essentially this means the photo is split up in two separate collection of numbers, both belonging to the frequency domain: one collection is called the spectrum and the other is called the phase). After the Fourier transform the transformation is filtered using a second Fourier transform of a so called 'kernel'. That actually causes the blur / deblur to take place (I'm still working on the user interface of that one, because currently it's simply a free block you can click in to create the kernel). Then the Fourier representation is transformed back to the original photo.
One of the biggest issues I had to solve was the memory demand of this transform. The Fourier transform requires a huge amount of memory for the bigger photos. For your average M9 DNG we're talking 16 bytes per number (a real number and an imaginary number, 8 bytes per piece), times the size of the closest power of 2 of the longest edge of the photo. In case of the M and M9 that's 8192 by 8192. Now multiply that (8192 times 8192 times 16) and you get a whopping 1073741824 bytes (roughly 1 gigabyte).
Then for the kernel we need the same amount. And then for some nice laplacian filtering or some other additional goodies, we need a third transform.
So in total we're talking at least 3 gigabytes for an average deblurring action.
Now, I was able to cut that down to 1.5GB by changing the doubles to floats (going from 16 bytes per number to 8 bytes per number), but that still wasn't enough.
My 64-bit Windows system with 4GB of memory simply couldn't handle it. Small photos (as shown in the example) were fine. The bigger ones crashed the software.
Well, to cut a long and boring story short, I solved it with memory mapped files. Essentially cache writing memory to disk. It does slow down a bit, but it works. All the huge DNGs now deblur without memory problems, at least on my system :-)
This whole thing isn't finished yet, there's more experimenting, but I will try to keep you posted and show you some more examples when things progress...
Wednesday, September 11, 2013
DNGMonochrome 0.9.72 beta released
No spectacular changes in this release, but it does come with some new stuff.
New in version 0.9.72
Lightroom plugin
If your work flow is based on Lightroom, the new plugin can be quite a help. It can be installed by choice (it's in the 0.9.72 installer, you don't have to download anything else... turn it off during installation if you don't use Lightroom, although installing it anyway won't harm).
A few notes:
Note that if you're working from a 'last imported' folder within Lightroom, you might not see the imported monochrome photo. If that happens, go to the Library module and select the folder the original is actually in. Then you should see the monochrome version.
You can keep converting the original in DNGMonochrome (changing filters or noise reduction and reprocess) and every converted copy will be imported automatically. Close DNGMonochrome after you're finished, or select a different DNG in Lightroom and go to the Help menu again to select 'Convert with DNGMonochrome' once more. The already running version of DNGMonochrome will close automatically and a new one will open with your selected DNG.
Read more about this plugin here (about installing, using, turning it off or deleting it if you want to get rid of it).
Why the strength setting for RAW filtering?
Well, the reasons are a bit fuzzy, but in hindsight, the RAW filtering with strength is a very simple procedure compared to the more complex RGB filtering. I haven't extensively compared both results side by side, but I did notice that the RAW filtering with strength (after compensating for the loss of exposure in Lightroom) seemed slightly cleaner and less noisy than similar results with RGB filtering.
There are some distinct differences:
Download
You can download the new version of DNGMonochrome here.
New in version 0.9.72
- Fixes some very minor bugs in the user interface, which didn't affect the conversion.
- Makes some small adjustments to the GreenSplit implementation of previous version, improving fine detail in darker areas.
- Improves the red and blue conversions. Especially the red conversion could suffer from a zipper like artifact, visible mostly on highlighted edges with bright red background. This started showing in some photos around 200 to 300% magnification.
- Improves the algorithm by applying a localised minimum and maximum during interpolation, which helps especially the very noisy photos and improves the outcome of the algorithm when used together with the 'sharper' setting.
- Adds code to enable this version to function with the new Lightroom plugin. The plugin installs through the regular installer, together with DNGMonochrome 0.9.72 (only for Windows Vista / Windows 7 and Lightroom 4/5).
- Brings back the strength setting for RAW red and RAW blue filtering, which was dropped too hastily in an earlier version... strength has the same range (steps of 5%) as the RGB filters... if you want to get to the RAW red or RAW blue results version 0.9.71 produced, push the strength slider to 100%.
- Adds a manual 'Update check' through a new button in the main screen... it will tell you if there's a new version available, provided you're online.
Lightroom plugin
If your work flow is based on Lightroom, the new plugin can be quite a help. It can be installed by choice (it's in the 0.9.72 installer, you don't have to download anything else... turn it off during installation if you don't use Lightroom, although installing it anyway won't harm).
A few notes:
- The plugin is more or less beta. This is my first Lightroom plugin, so be gentle if it doesn't work on your system as intended. Please try it out on some backup DNGs first and make sure it works properly! DNGMonochrome contains safeguards to avoid ever overwriting an original, but nevertheless, convince yourself first it works as intended.
- The plugin will not work with older versions of DNGMonochrome: you need to install it together with at least version 0.9.72 - the plugin is embedded in the installer of DNGMonochrome.
- The plugin will not work with older versions of Lightroom (earlier than version 4).
- Lightroom 4 doesn't work on Windows XP, so if you're on Windows XP, this plugin won't be very useful. Also, since DNGMonochrome itself was adapted to work with Lightroom, the XP version now has a separate installer. Pick the right one on the download page since the Vista/Windows 7 version of DNGMonochrome will not work on XP.
- Do not change the folder of DNGMonochrome (usually under Program Files) or move it to another location after installation: the plugin will get lost. If you need or want to install DNGMonochrome in a different folder, do it during installation, when the installer asks you for the installation path, or - if you want to change it after installation - uninstall DNGMonochrome, then reinstall and change the installation folder during installation (and be sure to include the plugin in the re-installation).
Note that if you're working from a 'last imported' folder within Lightroom, you might not see the imported monochrome photo. If that happens, go to the Library module and select the folder the original is actually in. Then you should see the monochrome version.
You can keep converting the original in DNGMonochrome (changing filters or noise reduction and reprocess) and every converted copy will be imported automatically. Close DNGMonochrome after you're finished, or select a different DNG in Lightroom and go to the Help menu again to select 'Convert with DNGMonochrome' once more. The already running version of DNGMonochrome will close automatically and a new one will open with your selected DNG.
Read more about this plugin here (about installing, using, turning it off or deleting it if you want to get rid of it).
Why the strength setting for RAW filtering?
Well, the reasons are a bit fuzzy, but in hindsight, the RAW filtering with strength is a very simple procedure compared to the more complex RGB filtering. I haven't extensively compared both results side by side, but I did notice that the RAW filtering with strength (after compensating for the loss of exposure in Lightroom) seemed slightly cleaner and less noisy than similar results with RGB filtering.
There are some distinct differences:
- With RGB filtering you get the right exposure setting at every strength setting. Strength at 5% will give the same exposure as strength at 100%. With the RAW filtering, the stronger you filter, the more you have to compensate in your RAW converter for lost luminance.
- RAW filtering doesn't care about white balance.
- RAW filtering can not do a green filter.
- Due to the loss of exposure it's not possible to use gradient filtering with the RAW filters. So if you only want to filter part of the photo, you'll have to use the RGB filters.
Download
You can download the new version of DNGMonochrome here.
Wednesday, September 4, 2013
Quick update
Yes yes, I know I have been a bit silent on the subject of DNGMonochrome, but not to worry, I haven't abandoned it. There will be a 0.9.72 soon (with Lightroom plugin, making it possible to convert from within Lightroom, and some other small improvements), and I still have some ideas to extend it. It's just that I have been quite busy the last few months doing other stuff, hence the silence...
Tuesday, September 3, 2013
Exhausted
 Don't worry, he was still breathing... in a warm double decker tram, shot from a tram in front of it...
Hong Kong Island, Hong Kong, 21 August 2013
Click on photo for the full version...
Monday, September 2, 2013
Apartments
 Apartments on Hong Kong Island near the east, Hong Kong, 23 August 2013
 Click on photo for the full version...
Sunday, September 1, 2013
The Peak I
 Shot from The Peak on Hong Kong Island, Hong Kong, 25 August 2013
 Click on photo for the full version...
Saturday, August 31, 2013

Friday, August 30, 2013
Skyline
 Kowloon, Hong Kong, 21 August 2013
 Part of the skyline of Hong Kong Island, shot from the Kowloon side during light show...
Click on photo for the full version...
Saturday, April 13, 2013
DNGMonochrome 0.9.71 beta released
It's a bit of an intermediate release, not planned, and mainly fixes some problems with the algorithm.
A note in general when using Lightroom: when importing monochrome DNGs, Lightroom will default to the settings of your color DNG. For sharpening, this default setting might be too high. DNGMonochrome concentrates on sharpness and resolution, and the produced DNGs need less sharpening than the Lightroom color versions do. Make sure to cast an eye on this setting if you think the DNG looks gritty, too noisy or too sharp.
You can download the new version of DNGMonochrome here.
- Fixes the 'maze' artifact on M8 and M9 conversions. This problem showed mainly on M8 photos and in brighter red areas of M9 photos. On the M8, the artifact was visible at 200% magnification with sharpening set to at least 20%. Incorporating the BayerGreenSplit value in the algorithm solved the issue. On the new M and the Canon conversions, the artifact didn't show (the BayerGreenSplit value on the M is 50 - for the M8 and M9 it's 500 - and on the supported Canons the value isn't registered at all when converting CR2 files to DNG).
- Fixes the few artifacts left when using the 'sharper' setting. Due to the implementation of the BayerGreenSplit value, the 'sharper' setting has less effect now on M8 and M9 photos (compared to previous versions). These artifacts were only visible at 300 to 400% magnification, mostly on highlighted edges.
- Fixes several smaller bugs that might have had a negative impact on the RAW and RGB conversions.
A note in general when using Lightroom: when importing monochrome DNGs, Lightroom will default to the settings of your color DNG. For sharpening, this default setting might be too high. DNGMonochrome concentrates on sharpness and resolution, and the produced DNGs need less sharpening than the Lightroom color versions do. Make sure to cast an eye on this setting if you think the DNG looks gritty, too noisy or too sharp.
You can download the new version of DNGMonochrome here.
Monday, April 8, 2013
The Labyrinth
Now, this wasn't the issue I had in mind to talk about next, but a user alerted me to a strange artifact in his M8 photos.
I recognized it, because I also saw it in one of my M9 photos, but on my photo it was a tiny patch and only visible at 400% magnification. I hadn't really bothered about it, under the assumption it was photo specific.
This is what it looks like:

800% crop from a red patch from M9 photo
As you can see, it's sort of a maze pattern.
Not immediately realizing what caused it, I started investigating. This user was kind enough to send me the original RAW file, because I only have a handful of M8 photos, and on my M9 photos this problem is hardly a problem and was difficult to spot.
On the M8 photo the artifact was way more obvious: visible at 200%, quite ugly at 300% and it was almost everywhere in the photo.
First I thought the sharpening was set too high, because if you import M8 monochrome DNGs, Lightroom (my version at least) starts at a default of 25% sharpening, which I think is too high for monochrome DNGs. Lowering the sharpening helped, and the pattern then disappears enough to not be distracting at 200%. Adding some masking also helped.
Problem gone, nice DNG at 100%.
But that didn't take away the fact I thought it was weird.
What caused this very specific pattern on parts that should look more equally gray?
So I first started tweaking the algorithm, assuming it got lost on these equal parts... something wrong with determining the direction for the averaging perhaps?
But that didn't help a lot. I could improve it a bit, but not get rid of it.
It was a bit maddening, since none of my attempts seemed to make a big difference, just these tiny changes that were not enough. It felt like I wasn't only trying to fix the maze, but that I was actually walking in it! Then I decided to try a re-size, because that only leaves the green pixels, and then see what kind of pattern that would create, if any.
And there it was: the green pixels were all over the place. And that didn't make sense to me, because I always assumed a regular patch of brightness would give similar values for the green pixels (apart from noise).
I could see the origins of the maze in this pattern... quite obvious interpolating on these green pixels would bring it out in full glory.
Concentrating on this strange difference between the green pixels, I suddenly remembered reading in the DNG documentation about the BayerGreenSplit value, which indicates how closely two green pixels (one on a red row, and one on a blue row) 'track' each others value.
And that was the 'eureka' moment.
Not taking this value seriously leads to the maze artifact, because the software wrongly assumes the value of the second green channel (the green pixels on a blue row) is unique. And although the value is indeed unique, it doesn't necessarily mean the algorithm should treat it as such.
How to implement the BayerGreenSplit value exactly is at this point still a bit unclear, because the documentation doesn't state in what units the value is set. The value can range from 0 to 5000, and the M8/M9 DNGs are set to 500, but 500 of what? Is this the direct difference between the two pixels? Or is it the difference after gamma correcting or exposure correcting? Or is it the minimum allowed divergence at which point you have to start correcting?
Frankly I think Adobe should be more clear on this value, since they use it in ACR. DNG is supposed to be an open standard, so not specifying clearly how certain parameters work, or how they should be interpreted, sort of leaves developers guessing, like I am now...
Experimenting with it in a first rough trial, by pulling the two green channels closer together, I've managed to get rid of the maze completely, so it's definitely the cause and the solution.
The divergence itself seems linked to the red channel: the more red, the more the green channels start to diverge, at least in the M9 conversion. It might be that red light is bleeding into the green pixels or the green pixels on a blue row are more sensitive to red light.
For now I've only concentrated on the M8 and M9, I'll have to analyze further to see what the Canon photos do.
You can mitigate the problem by not sharpening too much and by using the masking option (talking about Lightroom sharpening) so the more equal areas don't get sharpened at all.
Obviously that tip is just a work around, since this pattern needs to go.
This has priority, so I'll try to fix it as soon as possible, and bring out a new release.
Tuesday, March 5, 2013
Issue I: On Highlights Of The Blown Out Kind
It wasn't just noise reduction I've been working on... because there's a few other issues I like to resolve...
On highlights of the blown out kind
First of all, if you read some of the reviews of say the Leica M Monochrom, you'll notice that users discover that highlights get blown very easily.
Funny thing, DNGMonochrome does exactly the same: highlights that still give detail in Lightroom after B&W conversion are sometimes completely lost after conversion to monochrome with DNGMonochrome.
Here's a crop... a really tiny piece, perhaps 5%, from a Canon, with the highlights toned down a bit... nothing done about it otherwise... loaded into Lightroom without sharpening or noise reduction, then clicked on black & white... notice the detail at the top of the windows, in the glass (actually behind the glass).

Lightroom turned black & white...
Now look at the monochrome version with the same toned down highlights... it's all gone...

DNGMonochrome turned monochrome...
Apart from the clarity and sharpness of the monochrome version - also no sharpening or noise reduction on these monochrome crops - Lightroom clearly wins in the details... With a bit of work on that one I wouldn't be surprised if you preferred the Lightroom one, seeing how DNGMonochrome lets you down on those blown highlights.
And bringing down those highlights on the monochrome DNG in Lightroom really doesn't work. That only turns everything gray.
No, those monochrome windows are a lost cause... well... perhaps...
Lightroom can...
But why is it that Lightroom can and DNGMonochrome can't?
Well, this one isn't because I'm not Adobe...
No, it's quite simple really: if the monochrome file is blown, so is the color file... except... in the color file in a lot of cases it's only the green channel (the pixels registering luminance) that's blown, since the blue channel and especially the red channel get filtered much stronger and register lower values most of the time.
Hence, if you interpolate directly on luminance (the green pixels), as DNGMonochrome does, or if you shoot with a camera that only registers luminance, you lose that blown out detail.
In this particular color file, the green channel is blown, but the blue and red channels aren't, at least not on that detail behind the glass.
From a purist view: you could say that DNGMonochrome gives you the true experience :-)
If you color interpolate, you only have to lower the luminance portion of the blown bit to get your detail back, which then consists mainly of the information from the red and the blue channel. In fact, the simple procedure - during color interpolation - of mixing the three values can already be enough to recover detail if blue and red aren't too high: the influence of the green pixel is diluted. It even works when two channels are blown out. Detail recovery still possible through the third channel. Usually not the nicest, but possible.
So, people trading their color camera for a B&W only camera, suddenly discover the benefits of the Bayer filter when it comes to this issue, especially if they weren't really aware of this when shooting with the color camera. Their RAW converter saved them most of the time.
In an all B&W camera without Bayer filter nothing can be done about this. Perhaps patch the blown out part a bit in Photoshop, but the original detail is lost.
But in DNGMonochrome that's unnecessary, because the information from the blue and red channel is still around.
There's no need to let that detail go to waste.
So, enter the highlight recovery option... and then you get this...
DNGMonochrome turned monochrome with highlight recovery, bringing back the details at the top of the windows...
It's still in quite the experimental stage, because getting this right isn't easy, but it's one of the things I'm experimenting with and working on.
The big problem is that this works best if it's applied locally, but DNGMonochrome isn't set up for that. It's not difficult to apply these corrections to only a certain part of the photo - after say selecting the top of the window - but that selection isn't stored with the original. If you want to redo the photo you have to start all over.
So first I want to see if I can get this right for the whole photo.
Then another issue - be it less complicated - is that what seems blown out in the preview of DNGMonochrome might actually not be, when you load the DNG into Lightroom. So I need some way of detecting - and letting you know - when you should apply it and when not.
And yes, for parts of the photo this is actually cheating. When using this proposed option, DNGMonochrome will divert from the strict 'luminance only' approach... but only for the blown bits.
Actually DNGMonochrome already has the ability to partially recover blown highlights: the RGB filters. If you mix in a little bit of blue or red (try 5% or 10%) - depending on which channel gives you the most detail back (check via the RAW filters) - you most likely can get some of your detail back. But then you might alter other aspects of the photo you didn't want altered.
So, I hope to get this presentable enough for a next release, but currently I don't want to make any solid promises on this issue (I haven't shown you the ghastly effects this option can also produce when out of control).
Next time I'll talk about another issue I hope to get solved for the next release...
On highlights of the blown out kind
First of all, if you read some of the reviews of say the Leica M Monochrom, you'll notice that users discover that highlights get blown very easily.
Funny thing, DNGMonochrome does exactly the same: highlights that still give detail in Lightroom after B&W conversion are sometimes completely lost after conversion to monochrome with DNGMonochrome.
Here's a crop... a really tiny piece, perhaps 5%, from a Canon, with the highlights toned down a bit... nothing done about it otherwise... loaded into Lightroom without sharpening or noise reduction, then clicked on black & white... notice the detail at the top of the windows, in the glass (actually behind the glass).
Lightroom turned black & white...
Now look at the monochrome version with the same toned down highlights... it's all gone...
DNGMonochrome turned monochrome...
Apart from the clarity and sharpness of the monochrome version - also no sharpening or noise reduction on these monochrome crops - Lightroom clearly wins in the details... With a bit of work on that one I wouldn't be surprised if you preferred the Lightroom one, seeing how DNGMonochrome lets you down on those blown highlights.
And bringing down those highlights on the monochrome DNG in Lightroom really doesn't work. That only turns everything gray.
No, those monochrome windows are a lost cause... well... perhaps...
Lightroom can...
But why is it that Lightroom can and DNGMonochrome can't?
Well, this one isn't because I'm not Adobe...
No, it's quite simple really: if the monochrome file is blown, so is the color file... except... in the color file in a lot of cases it's only the green channel (the pixels registering luminance) that's blown, since the blue channel and especially the red channel get filtered much stronger and register lower values most of the time.
Hence, if you interpolate directly on luminance (the green pixels), as DNGMonochrome does, or if you shoot with a camera that only registers luminance, you lose that blown out detail.
In this particular color file, the green channel is blown, but the blue and red channels aren't, at least not on that detail behind the glass.
From a purist view: you could say that DNGMonochrome gives you the true experience :-)
If you color interpolate, you only have to lower the luminance portion of the blown bit to get your detail back, which then consists mainly of the information from the red and the blue channel. In fact, the simple procedure - during color interpolation - of mixing the three values can already be enough to recover detail if blue and red aren't too high: the influence of the green pixel is diluted. It even works when two channels are blown out. Detail recovery still possible through the third channel. Usually not the nicest, but possible.
So, people trading their color camera for a B&W only camera, suddenly discover the benefits of the Bayer filter when it comes to this issue, especially if they weren't really aware of this when shooting with the color camera. Their RAW converter saved them most of the time.
In an all B&W camera without Bayer filter nothing can be done about this. Perhaps patch the blown out part a bit in Photoshop, but the original detail is lost.
But in DNGMonochrome that's unnecessary, because the information from the blue and red channel is still around.
There's no need to let that detail go to waste.
So, enter the highlight recovery option... and then you get this...
DNGMonochrome turned monochrome with highlight recovery, bringing back the details at the top of the windows...
It's still in quite the experimental stage, because getting this right isn't easy, but it's one of the things I'm experimenting with and working on.
The big problem is that this works best if it's applied locally, but DNGMonochrome isn't set up for that. It's not difficult to apply these corrections to only a certain part of the photo - after say selecting the top of the window - but that selection isn't stored with the original. If you want to redo the photo you have to start all over.
So first I want to see if I can get this right for the whole photo.
Then another issue - be it less complicated - is that what seems blown out in the preview of DNGMonochrome might actually not be, when you load the DNG into Lightroom. So I need some way of detecting - and letting you know - when you should apply it and when not.
And yes, for parts of the photo this is actually cheating. When using this proposed option, DNGMonochrome will divert from the strict 'luminance only' approach... but only for the blown bits.
Actually DNGMonochrome already has the ability to partially recover blown highlights: the RGB filters. If you mix in a little bit of blue or red (try 5% or 10%) - depending on which channel gives you the most detail back (check via the RAW filters) - you most likely can get some of your detail back. But then you might alter other aspects of the photo you didn't want altered.
So, I hope to get this presentable enough for a next release, but currently I don't want to make any solid promises on this issue (I haven't shown you the ghastly effects this option can also produce when out of control).
Next time I'll talk about another issue I hope to get solved for the next release...
Tuesday, February 26, 2013
DNGMonochrome 0.9.7 released
Changes & Improvements
Dropped
Bug fixes
Additions
Some remarks on the noise reduction
You have to interpolate your photo at least once to make the noise reduction button become available. Changing any setting (filters, sharpness, re-size) will reset the noise reduction preview, and you'll have to reprocess your photo to make the button available again.
Note that the sliders in the noise reduction work differently compared to Lightroom. If you push them nothing is changed. You have to release the slider first.
The buttons to turn off specific options (the little buttons behind the sliders) only work on the preview. If you turn off say the regular noise reduction through the button and you reprocess the photo, the noise reduction is still applied.
The balance slider
The balance slider is slightly experimental and it's difficult to explain what it does exactly, without going into the details of the noise reduction algorithm itself. A simple way of explaining: it you push it to the right (the + setting) you start favoring the 'lighter' noise. If you push it to the left (the - setting) you start favoring the 'darker' noise. And with favoring I mean: it's reduced less. The balance slider can bring back additional detail in e.g. highlights, but at the cost of less noise reduction in other parts of the photo. It has quite a heavy impact, so if you feel the noise reduction isn't really noticeable, check the balance slider to see if it's in a + or - setting and move it back to the middle (0).
Download
You can download the new version of DNGMonochrome here.
And as always...
Do check back soon to see if there were any bugs I missed.
Also quite soon on this blog some ramblings about the new stuff I've been experimenting with...
- Changes the algorithms to one new one with option to go for a more sharper result
- Improves the switching between precooked and cooked preview by keeping the cooked preview in memory... this means when switching to the cooked preview, only the first time it will take a few seconds... subsequent switches from precooked to cooked are a lot faster now...
- Changes the size of the preview images to slightly bigger
- Improves and speeds up border interpolation (first and last two rows and columns of the photo)... previous method could produce artifacts...
Dropped
- Drops the median filters
- Drops the presets
- Drops the 'beautifying' step in the red and blue RAW conversion, since due to the new algorithm that didn't add noticeable benefits anymore... as a consequence the red and blue RAW conversions are a lot faster now...
Bug fixes
- After clicking on 'I see dead pixels...' and closing the window, the underlying image still in the preview would be invalidated, leading to crashes if you tried to change any of the settings (brightness, gamma etc.)
Additions
- Adds pre-interpolation noise reduction options for the secondary channels
- Adds noise reduction option for the final image
- Adds noise reduction option for the RAW red and RAW blue when used in filtering
- Adds option to batch process photos... select multiple DNGs by Shift-Click or CTRL-click in the list on the left - note that noise reduction is not possible in batch processing, auto-save needs to be switched on, and no preview of any of the processed photos will be shown...
- Adds support for the Canon EOS 500D (at user request)
- Adds support for the Leica M (note that this support is based on pre-production DNGs)
- Adds option to skip the interpolation and go for a resize, only keeping parts of the green channel... this leads to 25% of the original photo (50% of the original width and 50% of the original height) keeping only the luminance pixels. It's mainly useful if you intend to downscale the original (smaller than 50% of the original size or width). You get the true luminance result without interpolation. You can still use all the filter options, since the red RAW and blue RAW are also resized, and perfectly overlap the regular result. For DNGs of the Leica M9, this option leads to a regular result that would be equivalent to the output of a 4.5mp black & white sensor. You can also use this option as a quick preview, since it's faster than interpolating. Then, after getting to the desired result (e.g. the right filter settings), turn the option off and make the final copy. Don't use this option if you intend to print the result.
Some remarks on the noise reduction
You have to interpolate your photo at least once to make the noise reduction button become available. Changing any setting (filters, sharpness, re-size) will reset the noise reduction preview, and you'll have to reprocess your photo to make the button available again.
Note that the sliders in the noise reduction work differently compared to Lightroom. If you push them nothing is changed. You have to release the slider first.
The buttons to turn off specific options (the little buttons behind the sliders) only work on the preview. If you turn off say the regular noise reduction through the button and you reprocess the photo, the noise reduction is still applied.
The balance slider
The balance slider is slightly experimental and it's difficult to explain what it does exactly, without going into the details of the noise reduction algorithm itself. A simple way of explaining: it you push it to the right (the + setting) you start favoring the 'lighter' noise. If you push it to the left (the - setting) you start favoring the 'darker' noise. And with favoring I mean: it's reduced less. The balance slider can bring back additional detail in e.g. highlights, but at the cost of less noise reduction in other parts of the photo. It has quite a heavy impact, so if you feel the noise reduction isn't really noticeable, check the balance slider to see if it's in a + or - setting and move it back to the middle (0).
Download
You can download the new version of DNGMonochrome here.
And as always...
Do check back soon to see if there were any bugs I missed.
Also quite soon on this blog some ramblings about the new stuff I've been experimenting with...
Friday, February 15, 2013
Progress report...
So how's the next release coming along?
The logic of the user interface - with all the new options in place - turned out to be quite complex, and the number of supported cameras has grown (for the next release also the Canon EOS 500D and the new Leica M, based on pre-production DNGs), and files from all the cameras need to be tested and put through all the new options.
So far so good.
The most problematic camera remains the Canon EOS 5D mark II. It's the odd one out, with its Bayer filter slightly different. And that difference keeps creeping up and causing problems in unexpected places.
The Canons are the most complicated anyway.
They differ per model in the treatment of the black level and obviously in sensor size. The 350D and 40D use separate lines to measure the black level (stored in the Delta tags), the other models don't, and they all make extensive use of very irritating variables like ActiveArea, CropOrigin, CropSize, MaskedArea... all kinds of offsets you constantly have to take into account.
Especially with the new 'resize' option, where the photo is basically cut in half on both sides, I had a hard time creating a DNG for the Canons with also the correct information where all these offsets were concerned. One wrong value and Lightroom wouldn't show the DNG.
I also ran into a snag with the noise reduction and the green filter.
Turns out the algorithm of the green filtering doesn't sit well with separately noise reduced results being mixed. Contrary to all the other filters, reducing noise in say the red result (for use in the green filter) and not reducing noise in the regular and blue result, can actually lead to more noise and quite ugly side effects. My basic conclusion was that, when mixed for green, the values within the separate results are too much intertwined and dependent on each other for the final - green filtered - end result. Changing values in one result do not necessarily lead to an overall reduction of noise. The two other - non-noise reduced - results can block the effect or even make it worse. This is also partly due to the algorithm - to get to the green filtered result - which is quite different compared to the red and blue filtering.
I need to study this a bit closer though. I wanted to do that anyway, cause the green filtering can also turn quite ugly if the white balance is pushed too much towards the yellow (slider to the right). Want to see if I can improve that or if I need to adapt the strength setting.
For now I solved the noise reduction and the green filter by locking the sliders. Noise is best reduced (and without any problems) in the green result, if all the results (regular, red and blue) are noise reduced equally before they're mixed. In the end it means that the noise reduction in DNGMonochrome isn't very beneficial for green filtered results. Lightroom can most likely deal with that one equally effective.
I hope to figure out a better way though, because in the gradient filtering Lightroom will be more difficult (although not impossible with their gradient noise reduction option in version 4).
Overall I probably need another week to finish up this release.
Sunday, January 27, 2013
DNGMonochrome and the LEICA M (Typ 240)
Got my hands today on a few DNG files from the new Leica M (see here - scroll down for the DNG files), in firmware called 'LEICA M (Typ 240)' and obviously I had to see if these DNGs could be converted to monochrome by DNGMonochrome.
[edit: much nicer examples can be found here]
Happy to report they could.
I'd show you an example, weren't it for the fact that would constitute a copyright violation.
Let's say that the examples of the second link were impressive (in itself, but also the conversion to monochrome, especially the 'snow' photos).
It was a very quick test, but it seems that the only issue I have to solve is the embedded preview image. For the Leica M8 and M9 (al beit stored differently between the two models) the preview image is an uncompressed bitmap. The Leica M DNG stores a JPG preview.
I'll have to run some more tests - filtering, noise reduction etc, - and obviously test again when the camera is officially launched (see if the non-beta firmware didn't change anything) - but I suspect the next release of DNGMonochrome will also be prepared for the Leica M, then you can give these examples a go yourself.
[edit: it seems the embedded preview image is 160 by 120 pixels - rather small (half the size of the M9 preview image) - a JPG, and there's a black bar on top of it, also visible when you open the DNG directly with e.g. Picasa Photo Viewer or when you import the DNG into Lightroom. I suspect this might be solved when the firmware reaches a production stage...]
Tuesday, January 22, 2013
The Sight of Silence II
Making quite a bit of progress with the noise reduction.
For people just tuning in: I'm talking about the next release (not here yet).
DNGMonochrome doesn't show you a 'live' result you can work on and I decided that for noise reduction that had to change. I wanted to be able to push those sliders and see the effect instantly, without having to re-interpolate the whole photo.
But in order to do that I had to cut the area that's interpolated, since speeding up the whole procedure wasn't an option: apart from technical limits, it would never be fast enough.
So I implemented a dedicated 'noise preview', which will show the preview image (after interpolating the total photo once) with a 100% crop and a 200% crop, quite similar to the main screen.
You can then navigate the preview image and select the area you want to inspect. And the selected area will be noise-reduced very quickly by re-interpolating only the selected bit and not the whole photo.
This instant feedback is really the only way, because the noise reduction options I implemented so far are quite extensive.
Before interpolation
Before interpolation you can denoise the secondary channels of the RAW file separately (e.g. when producing a regular monochrome DNG you can denoise the red channel and the blue channel before interpolation). The effect is very subtle and you really have to look for it, but especially in the shadow areas it's quite noticeable.
When interpolating with the RAW red filter or the RAW blue filter, these 'before interpolation' sliders work on the green and blue channel and on the green and red channel respectively. Here the effect is a bit stronger, because the green channel is more dominant and occupies 50% of the sensor.
The main channel is untouched, because for that one it makes more sense to reduce noise after interpolation, since the before and after values are the same, e.g.: when interpolating the regular monochrome, the green pixel values don't change. Also, the effect of reducing noise in the main channel before interpolation leads to very strong and unsatisfactory results: too much detail gets lost.
After interpolation
And then there's three sliders for the 'after interpolation' results. They work on the final result, where noise reduction is applied on the DNG after it is reduced to one monochrome channel. These sliders also work on the RGB filters, where noise reduction is applied to the separate results before they are mixed.
Both the before and after interpolation have a detail slider, which works (in effect) quite similar to the Lightroom detail slider.
Here's a preliminary screenshot of the noise preview window.

Note that the final result in the next release might (and most likely will) look different. It's not finished yet. Also, I was a bit apprehensive about the 200% preview, since the upscaling algorithm is out of my hands. For quality you have to concentrate on the 100% view. The 200% will give you a good 'noise' indication, but it will also show jagged edges - due to the upscaling - and an overall fuzzy image.
Despite all these noise reduction options, my advice would still be to use the Lightroom noise reduction (or any other RAW converter you might be using) for the final result if possible (e.g. when converting to regular monochrome).
I think the 'before interpolation' sliders are very useful for all conversions, and when you're using the RGB filters you should use the noise reduction for the red and blue result, but otherwise I would leave it up to your regular RAW converter.
Not that there's anything wrong with the present implementation, but in a practical sense: DNGMonochrome doesn't remember the position of the sliders per photo. If you want to 'redo' the DNG conversion to monochrome, you have to start all over again. In that sense it's best to limit the use of these options within DNGMonochrome as much as possible.
For the RGB filters however, Lightroom isn't a good alternative. Once you start mixing the red and/or blue result for filtering, Lightroom can only partly help you out if the red or blue channel turns out too noisy. You have to tackle that noise in DNGMonochrome first, before you create the final monochrome DNG. And that was also the main reason for this extensive noise reduction implementation.
As mentioned before: I hope to have all this - and some other new stuff - finished somewhere in February...
Wednesday, January 2, 2013
Sci-Fi cat
 Dozing off after gouging on the krupuk we fed her... she loved it...
 Click on photo for the full version...
Subscribe to:
Posts (Atom)